
Melbourne’s Leading Concrete Pouring Specialists
Oops! Something went wrong while submitting the form.
.jpg)
In-situ concrete wall construction involves pouring concrete directly into formwork on-site, creating strong, seamless walls tailored to each project. This method is becoming increasingly popular in modern builds for its exceptional durability, fire resistance, and superior thermal mass performance.
It also offers a clean, monolithic finish that suits both structural and aesthetic demands. From site prep to final inspection, each stage must be executed with care.
This step-by-step guide outlines the entire process, helping builders, contractors, and project managers deliver professional, high-quality concrete wall installations.
In-situ concrete wall construction refers to the process of casting concrete walls directly on-site within temporary formwork, rather than using precast panels transported to the site. The term “in situ” means “in place,” highlighting the fact that the structure is built exactly where it will stand.
This method allows for custom wall shapes, sizes, and configurations to suit specific architectural or structural needs. It’s widely used in residential, commercial, and infrastructure projects where strength, continuity, and seamless integration are essential. In-situ walls are typically reinforced with steel bars and require proper curing to achieve long-lasting durability.
Compared to alternatives like precast or blockwork, in-situ concrete offers better structural integrity, enhanced fire resistance, and superior thermal and acoustic insulation. It also reduces the need for joints, creating a monolithic appearance that aligns with modern design aesthetics.

Successful in-situ concrete wall construction begins with a clean and well-prepared site. Remove any debris, vegetation, or obstacles that may interfere with wall alignment or access. This stage ensures a stable working area that supports both safety and precision during execution.
Once cleared, conduct a geotechnical investigation to understand the soil’s strength, load-bearing capacity, and drainage characteristics. These findings determine how the foundation will support the wall. Neglecting this step can lead to structural settlement or water ingress later.
Next, use surveying equipment like total stations or laser levels to accurately set out the wall’s location. This includes defining boundaries, checking for squareness, and marking elevations. Precise layout is critical to maintaining consistency throughout the pour.
Finally, double-check that all measurements align with the approved project plans. Any discrepancies should be addressed before progressing to the next step. This initial planning saves time, reduces costly errors, and creates the foundation for everything that follows.
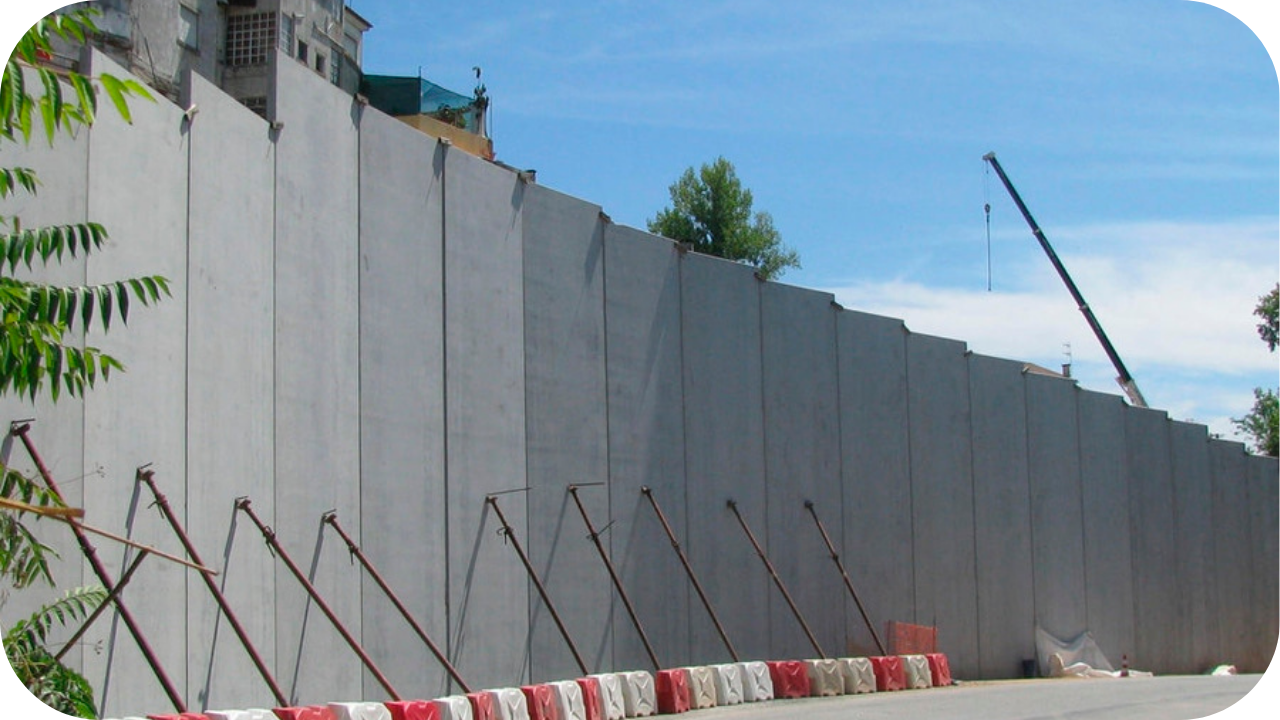
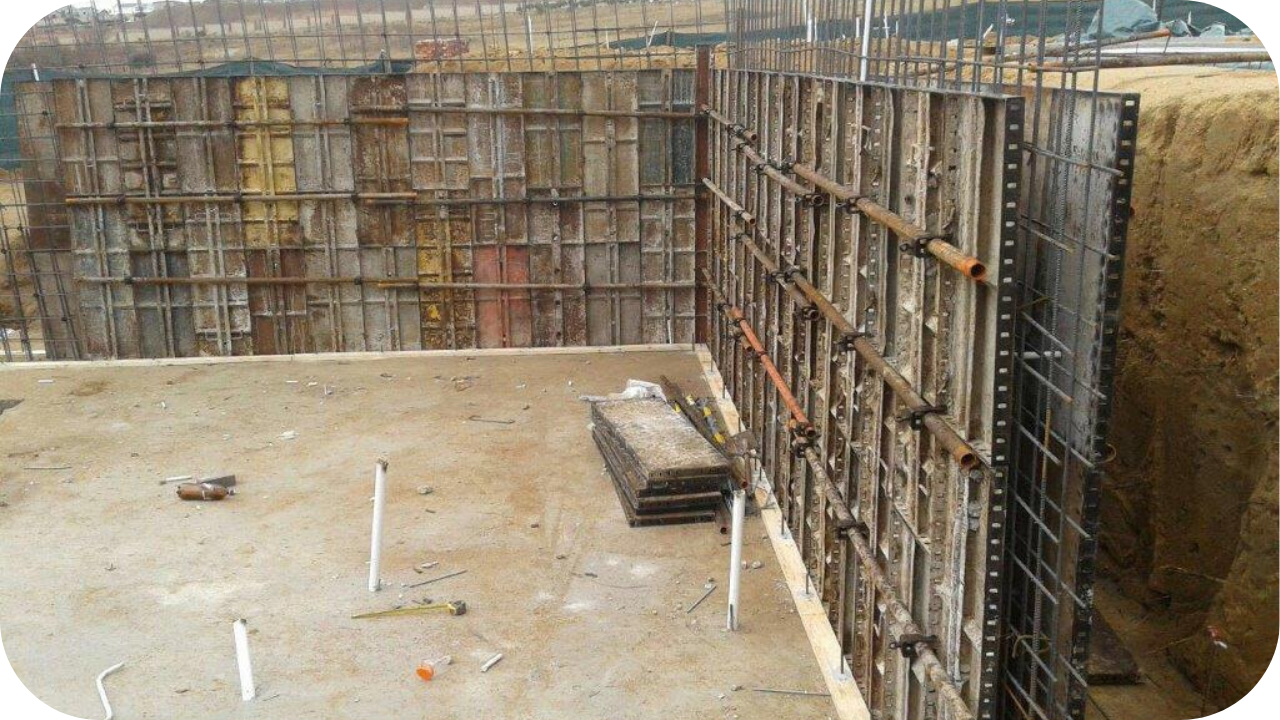
Formwork gives the concrete its shape and structure while it cures, so precision is essential. Choose the formwork type based on your project’s needs, timber for flexibility, steel for durability, or plastic for smooth finishes. Your choice should also consider budget and reuse potential.
Ensure the formwork is well-braced, leak-proof, and securely fixed to withstand the pressure of fresh concrete. Weak or poorly sealed forms may bulge, leak, or collapse, compromising the wall’s strength and finish. Stability must be checked thoroughly before pouring begins.
Position the formwork to exact dimensions and levels, matching the architectural and structural plans. This avoids errors that might require grinding, cutting, or patching later. Accuracy at this stage improves both the build and aesthetic outcomes.
Before concrete is poured, apply a release agent such as oil or chemical coating to the inner surfaces of the formwork. This allows for easy stripping once the concrete has set, reducing surface damage and preserving the wall’s finish.
Reinforcement provides the tensile strength that concrete alone lacks. Follow the structural drawings to position steel bars correctly in terms of spacing, thickness, and configuration. Errors in layout can reduce load capacity and lead to early failure.
Secure the bars firmly using tie wire and ensure they’re supported with chairs or spacers. This keeps the rebar in place during the pour and maintains the necessary cover depth. Without this, steel may shift or rest too close to the formwork.
Concrete cover is critical for protecting steel from corrosion. Maintain the required distance between the rebar and outer concrete surface to meet design and durability requirements. Failure here compromises long-term structural integrity.
Before pouring, inspect the reinforcement layout thoroughly. Every connection, bar placement, and support should meet specifications. Catching errors now avoids expensive fixes once the concrete sets.
Concrete mix selection plays a major role in wall performance. Choose a mix that suits your structural needs and weather conditions. The right blend ensures strength, workability, and crack resistance.
During pouring, maintain a continuous, even flow to avoid cold joints and structural weaknesses. Stopping or pausing the pour can create lines of weakness that affect the wall’s integrity. Keep the process smooth and uninterrupted.
Use mechanical vibrators to eliminate air pockets and help the concrete settle properly around reinforcement. This prevents honeycombing and voids, ensuring a dense, durable finish. Operators should be trained to avoid over-vibration.
Monitor the concrete throughout the pour to ensure consistency and check for signs of segregation or bleeding. A well-executed pour ensures the wall is both strong and visually clean once stripped.

Once poured, the surface must be treated and finished according to the design. Trowelling, screeding, or brushing should be done while the concrete is still workable. This helps achieve the desired texture, slip resistance, or architectural effect.
Pay close attention to corners, edges, and vertical alignment. Irregularities can affect structural joining and aesthetic appeal. Smooth, clean edges improve not only the look but also the structural bonding with adjoining elements.
Apply any specified surface treatments like anti-graffiti coatings, waterproof membranes, or sealers. These treatments enhance durability, especially in exposed or high-traffic areas. Timely application ensures proper bonding.
Consistency in finishing across the entire wall face is essential. Irregular textures or sheen can make the surface look patchy and unprofessional. A uniform finish reflects the care and quality put into the entire build.
Curing is the most overlooked yet vital step in concrete wall construction. It allows the concrete to hydrate fully, increasing strength and reducing cracking. Begin curing as soon as the surface is firm enough to retain moisture.
Depending on conditions, use wet hessian, misting sprays, or curing compounds to keep the surface moist. Maintain this for at least 7 to 14 days, depending on the wall’s size and function. Inadequate curing leads to surface shrinkage and early deterioration.
Weather plays a big role during curing. Protect the wall from direct sunlight, strong winds, and heavy rain. Rapid moisture loss during this stage weakens the surface and leads to long-term issues like dusting or scaling.
Make curing part of your timeline, not an afterthought. With proper moisture and time, your in-situ wall will meet or exceed its design strength, ensuring lasting performance.

Once the concrete has sufficiently cured, it’s time to strip the formwork. Do this carefully using proper tools to avoid chipping or damaging the wall edges. Rushing this step can undo all the care taken so far.
Inspect the surface for any cracks, honeycombing, or exposed reinforcement. These defects must be addressed immediately with patching compounds or structural grouts. Ignoring them compromises the wall’s strength and appearance.
If surface treatment or painting is planned, this is the time to prepare the surface. Sanding, cleaning, or smoothing may be required depending on the finish. A clean surface ensures proper adhesion.
Only proceed with additional loads or construction when the wall passes structural inspection. This ensures it can safely support the next phase of the build, whether that’s floors, slabs, or another level.
After the wall is complete, final quality checks validate the success of the build. Conduct compressive strength testing through core samples or cylinders to confirm the concrete meets design specifications.
Measure the wall’s alignment, level, and plumb to ensure geometric accuracy. Any warping or deviation may affect future finishes or adjoining elements. These checks help catch minor issues before they escalate.
Apply joint sealants or protective coatings if required by the environment. These treatments prevent water ingress, chemical damage, and wear from external exposure. Proper sealing increases the wall’s lifespan.
Schedule periodic maintenance based on exposure and structural role. Inspections, crack monitoring, or surface re-treatments may be needed over time. A strong in-situ wall deserves ongoing care to protect your investment.
Not all walls are built equal. If you're after strength, flexibility, and long-term performance, in-situ concrete walls stand head and shoulders above the rest:
In-situ concrete walls deliver unmatched strength, design freedom, and longevity, but only when done right. Follow each step with care, and the results will speak for themselves. Need help executing a flawless pour? Urban Pour is here to get it done with precision.

Safe concrete pours begin with strong, well-designed formwork. This article breaks down essential formwork rules that keep structures stable and reduce the risk of failures.
See more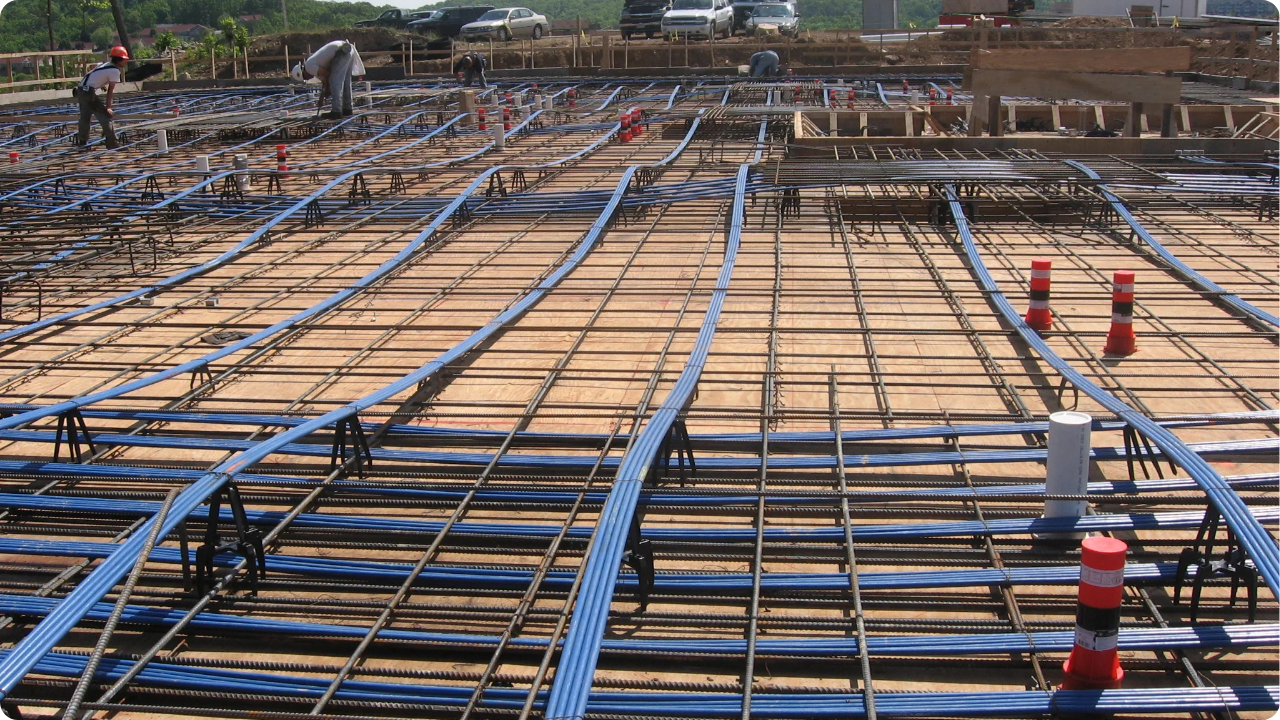
Poor post-tensioning can lead to cracking, deflection, and long-term structural issues. This article outlines common mistakes and shows how to avoid them for safer concrete performance.
See more
Choosing the right concrete slab thickness protects your project from cracks, movement, and costly repairs. Understand key factors like soil, loads, and engineering to build with confidence.
See more